Rosemary (Salvia rosmarinus) is one of those herbs that disappears quickly once you start using it regularly. It’s perfect for adding to roasting trays, sauces, marinades, and even cocktails. But constantly buying fresh bunches can quickly become expensive, and supermarket pots often don’t last long on your kitchen counter.
By propagating your own rosemary, you can easily grow a steady supply at no cost. One healthy parent plant can provide you with a constant stream of fresh rosemary, saving you money while ensuring you always have the flavor you love. Moreover, growing your own avoids the disappointment of supermarket herbs that wither away after just a couple of weeks indoors.
Taking a single mature rosemary plant and turning it into several younger plants lets you preserve the exact aroma you enjoy while cutting future costs to nearly nothing. Plus, there’s an environmental benefit to this method: less plastic, fewer transport emissions, and a reduction in impulse buys that often end up in the compost. Whether you have a small balcony or just a sunny windowsill, learning how to propagate one resilient herb can make a noticeable difference in how often you cook with something fresh.

The Simple Process: Water First, Soil Later
One popular method among hobby gardeners is deceptively simple and doesn’t start with seeds or typical cuttings planted directly into soil. Instead, the plant is encouraged to root in water first, and then transferred to soil once it starts showing signs of growth.

Choosing the Right Shoots
Success begins with selecting the right part of the plant. You want shoots that are firm, green, and flexible, avoiding the older woody stems near the base.
- Length: Around 10–15 cm (4–6 inches) per shoot
- Texture: Fresh, green, and not yet stiff or barky
- Health: No yellowing needles, dark spots, or mold
Use clean, sharp scissors or secateurs to snip just above a leaf node. This will allow the mother plant to branch out and stay compact, while you begin harvesting future “baby plants.”
Preparing the Shoots for Rooting
Once the shoots are cut, remove the needles from the lower third of each stem, as this is where the roots will form.
Fill a clean glass or small jar with lukewarm water. While cold water won’t harm the process, using slightly warm water reduces plant shock.
Place the prepared shoots in the glass, ensuring that only the bare stem is submerged, with the leafy tops staying dry and above the rim. Then, place the glass in a shaded, bright spot, away from direct midday sunlight. Direct sunlight can dry the needles and heat the water too quickly, hindering the rooting process.
From Water to Roots
Now comes the waiting game. It can take several weeks before much happens, but patience is key. Change the water every two days to keep bacteria and algae under control while providing fresh oxygen for the developing roots.
After about 4 to 8 weeks, you should start to see tiny white roots emerging from the submerged part of the stem. As soon as the roots are about 1–2 cm long, the shoot is ready to be planted in soil.
If after eight weeks you notice no root growth, the shoot likely wasn’t strong enough from the start. It’s often quicker to start again with a fresh cutting from the original plant than to continue waiting.
Potting Up: Choosing the Right Soil
Once the shoots have roots, it’s time to move them into soil. Rosemary needs good drainage, as standard compost can sometimes retain too much moisture, leading to root rot.

A simple mix of one part garden soil or all-purpose compost and one part coarse sand or fine grit works well. This combination allows for proper moisture retention without leaving the roots sitting in water.
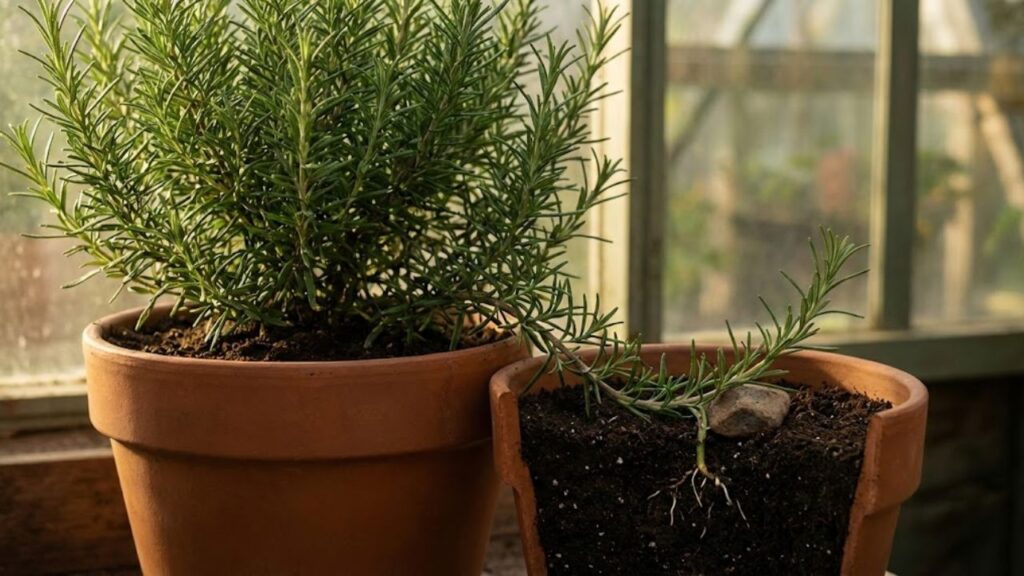
Use a pot that is at least 15 cm (6 inches) deep, with a drainage hole. Rosemary grows into a small shrub, so it benefits from extra depth right from the start.
Potting Process
- Step 1: Add a drainage layer (e.g., pebbles or broken pot pieces) at the bottom of the pot to prevent water from collecting around the roots.
- Step 2: Fill the pot with the sand-soil mix, leaving a small hollow in the center for the rooted stem.
- Step 3: Place the rooted stem in the hollow, making sure the roots are spread out.
- Step 4: Gently backfill with soil and lightly press to remove air pockets around the roots.
- Step 5: Water the plant once and allow the surface to dry slightly before watering again. This encourages deeper root growth.
Set the pot in a sunny location that receives 6–8 hours of light per day. A south-facing windowsill, bright balcony, or sheltered terrace are ideal spots. Just be sure the pot doesn’t sit in standing water after rain.
Keeping Your Rosemary Healthy
Once potted, your new rosemary plant will behave like its parent: it likes sun, dislikes soggy soil, and benefits from light pruning rather than heavy cutting.
- Pruning: Never remove more than one-third of the foliage at once. Large cuts can stress the plant and slow down its growth.
- Feeding: Use organic fertilizer, like compost or mild liquid feed, during the growing season to support healthy growth.
- Needle Watch: Yellowing or falling needles may indicate poor plant health, often due to waterlogged soil or root damage during transplanting.
Why This Method is So Popular
Gardeners love the “water glass first, pot later” method for several reasons:
- Lower cost: One plant can provide herbs and new plants for years.
- Stable flavor: Since the new plants are clones, their flavor stays true to the original plant.
- Faster harvest: Water-rooted cuttings grow faster than seedlings from seed trays.
- Flexible location: This method works in small spaces like kitchens or balconies as well as in full gardens.
- Less waste: Fewer plastic pots and less packaging than buying fresh herbs repeatedly.
Common Pitfalls to Avoid
While this method is forgiving, beginners often make a few common mistakes:
- Too much sun: Direct sunlight can warm the water too quickly, killing the tender shoots. Place the glass in bright but indirect light.
- Too much water: Rosemary prefers to dry out between waterings, so let the soil dry before watering again.
- Woody stems: Older, woody stems are less likely to root in water. Stick to younger, green shoots for better results.
Bonus Tips
“Well-drained soil” means compost that allows water to pass through quickly, not holding it like a sponge. Adding sand or grit to regular compost helps achieve this in pots.
If your rosemary has been indoors for a while, it’s important to “harden it off” before moving it outside. Gradually introduce it to outdoor conditions over the course of a week to avoid shocking the plant.
With this simple, cost-effective method, you can turn a single plant into a small herb garden that continuously provides fresh rosemary for cooking—without ever needing to visit the supermarket’s herb section again.
And if you’re interested in expanding to other Mediterranean herbs, like lavender or sage, this method works just as well. Each herb has its quirks, but the core principle remains the same: a fresh green shoot, time in water, a gritty potting mix, and plenty of sunlight.