You pull a rock-hard baguette from the freezer, dinner is in ten minutes, and the oven is already full.
The familiar panic sets in: you wanted fresh, warm bread on the table, not a chewy compromise or a soggy, microwaved brick. A top baker’s trick, though, turns frozen slices into something surprisingly close to bakery‑fresh in well under a minute.
Why we keep stuffing bread in the freezer
Freezing bread has quietly become a weekday survival tactic. Single people, couples and smaller households often struggle to finish a full loaf before it stales. The freezer solves that problem instantly.

Buying one good-quality loaf and freezing it in slices lets you pull out only what you need. That fights food waste, saves money, and keeps decent bread in the house even when you skip the bakery run.
 Goodbye footprint marks on your sandals: the trick to erase them and make them look new again
Specialists point out another little-known point: freezing changes bread’s starches in a way that can benefit your gut. When bread cools and freezes, part of the starch “retrogrades”, forming what scientists call resistant starch. Your small intestine barely absorbs this type, so it behaves more like fibre.
Freezing bread doesn’t just extend shelf life; it nudges some of the starch towards fibre-like behaviour in your gut.
Resistant starch then reaches the colon, where bacteria ferment it and produce short-chain fatty acids such as butyrate. That compound helps maintain the tight links between cells in the intestinal wall, supporting a stronger gut barrier. So that frozen slice is not necessarily a nutritional downgrade compared with the fresh one.
How to freeze bread so defrosting actually works
The speed and quality of defrosting start with how you freeze your bread in the first place. Bakers insist on one basic rule: never refreeze bread that was already frozen and thawed. Start with a fresh loaf.
Preparation before freezing
- Choose a fresh loaf that has fully cooled from the bakery or oven.
- Decide whether you’ll freeze it whole or pre-sliced, based on how you usually eat it.
- Portion it: single slices, half-loaves or individual rolls for easier use later.
Slices are far easier to manage for last‑minute meals or breakfast. You can take two or three, leave the rest untouched, and defrost them evenly in seconds. A whole loaf takes longer and is harder to heat consistently.
Packaging that protects texture
Air is the enemy here. Freezer burn dries out bread and ruins crust and crumb long before any ice crystals appear.
For best results, use:
- Freezer bags with as much air pressed out as you can manage, or
- Rigid plastic containers with tight‑fitting lids, or
- A double wrapping: first in paper or a linen towel, then in a bag.
Thicker wrapping shields the loaf from harsh freezer air and odours from nearby foods. That’s especially helpful if the bread is staying frozen for more than a couple of weeks.
The baker’s 30‑second trick: no oven, no toaster
Once bread is frozen properly, the real problem is speed. Traditional methods usually require planning. You can leave the loaf on the counter for a few hours, or you can reheat it in the oven for 10–30 minutes. Both can work, but they are useless when the meal is already on the table.
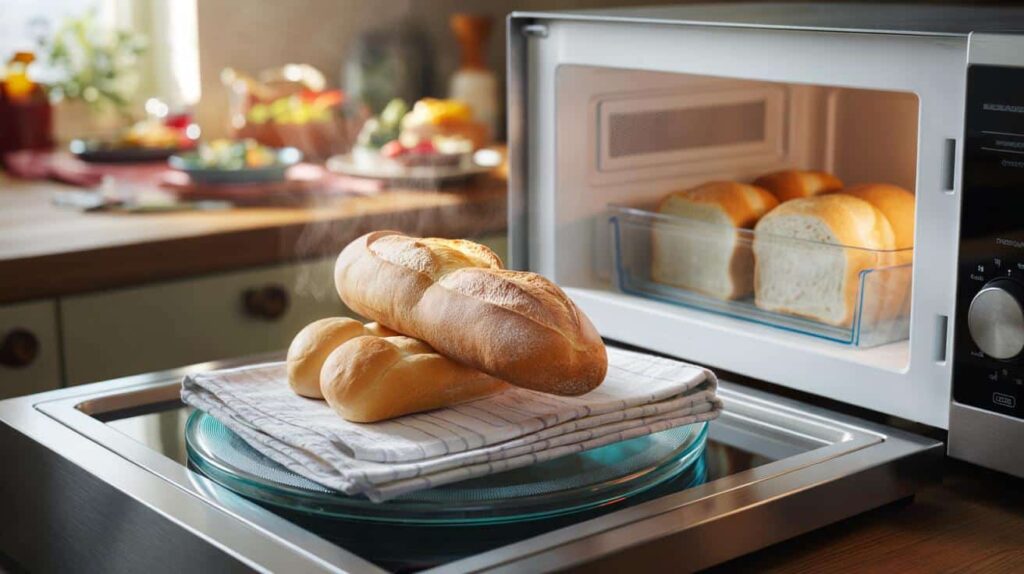
American baking expert Peter Reinhart, known for his technical yet practical approach, describes a faster approach that relies on the microwave and a simple piece of cloth. The surprising part: it doesn’t give you the usual rubbery microwave texture.
Instead of blasting frozen bread directly, the baker uses a damp cloth as a “buffer” that manages steam and heat in the microwave.
Step-by-step: from frozen to warm in 30 seconds
The method is simple enough to use on a busy weekday evening:
- Take a clean kitchen towel or cloth.
- Lightly moisten it with water. It should be damp, not dripping.
- Lay the damp cloth flat on the microwave’s rotating plate.
- Place the frozen bread directly on top of the cloth.
- Set the microwave to around 750–800 watts.
- Heat for 30 seconds and check the result.
The cloth soaks up the excess moisture released as the ice inside the bread melts. That helps keep the crust from going leathery while the inside softens. The brief, controlled blast of heat is enough for slices or small rolls. Larger pieces might need a second 20–30‑second round, but the starting point stays remarkably fast.

Why the cloth actually matters
Microwaves excite water molecules. If you put frozen bread directly on the plate, melting ice in the crumb tends to rush outward. Without anything to absorb and spread that moisture, the crust becomes tough and the inside ends up unevenly heated.
The damp cloth acts like a shock absorber. It picks up much of the moisture leaving the bread, and it also emits gentle steam back towards the crust. That combination helps you get a soft interior and a surface that feels closer to freshly baked than the usual soggy microwave attempt.
When you do have time: the slower oven method
If you’re planning ahead or reheating a larger piece, the same baker suggests a more traditional oven approach.
| Method | Temperature / Power | Time | Best for |
|---|---|---|---|
| Damp cloth in microwave | 750–800 W | 30–60 seconds | Slices, small rolls, urgent meals |
| Oven with damp cloth wrap | About 200°C | 10–30 minutes | Half-loaves, baguettes, crusty bread |
For the oven, the idea is similar. Wrap the frozen bread in a cloth dampened with hot water, then place it directly on the oven rack at around 200°C. A small baguette piece or a few rolls can be ready in roughly 10 minutes. A larger loaf section can need up to 30 minutes.
The cloth keeps the surface from drying while the heat penetrates to the centre. You end up with a crisped crust and a soft, warm crumb, very close to fresh bread pulled from a baker’s oven.
Common mistakes when thawing frozen bread
Even with a good technique, a few habits can ruin the texture.
- Leaving bread uncovered on the counter all day. The crust dries out and the crumb goes stale before it’s fully thawed.
- Using high microwave power for too long. This overheats the water in the crumb and makes it rubbery.
- Heating from frozen on a grill without any steam. The outer layers can burn while the centre stays icy.
- Refreezing thawed bread. Each cycle worsens texture and can encourage microbial growth once it’s back at room temperature.
What happens inside the bread as it freezes and thaws
Behind these home tricks lies some basic food science. Bread is essentially a network of gluten proteins and gelatinised starch, full of tiny air pockets. Water is scattered throughout this structure.
When you freeze bread, water turns to ice crystals. If the process is slow or the bread is poorly wrapped, those crystals become large and damage the structure around them. Fast freezing and good packaging keep those crystals smaller, so the crumb springs back more effectively when reheated.
On thawing, the goal is to re-soften the starches and redistribute moisture without washing it all out to the crust. Gentle, brief heat plus managed steam, whether from a cloth or oven humidity, helps repair some of the stiffness that naturally sets in.
Practical scenarios for using the 30‑second trick
Imagine you come home late, with only a pot of soup in the fridge and a solid block of sliced bread in the freezer. Placing two slices on a damp cloth in the microwave gives you warm, flexible bread in less time than it takes the soup to steam.
Or picture a weekend brunch. You forgot to buy fresh rolls, but you have a stash of frozen ones from a good bakery. A couple of short rounds on a damp cloth at medium‑high microwave power restore them well enough that few guests would guess they had ever seen a freezer.
When the microwave isn’t an option
Some households avoid microwaves entirely, or the appliance might already be occupied. The same logic can be adapted with other tools.
In a covered pan on low heat, you can briefly steam frozen slices on a small rack above a bit of water, then crisp them quickly in a dry pan. A similar approach works in an air fryer: wrap frozen bread lightly in damp baking parchment for the first few minutes, then remove it for a short, dry blast to crisp the outside.
Whatever method you choose, the combination of controlled moisture and moderate heat is what revives frozen bread. Once you understand that balance, a rock-hard loaf in the freezer feels far less like a last resort, and much more like a ready reserve of almost-fresh bread waiting for its 30‑second rescue.